big posts

    Sewing Zero Waste Culottes from The Craft of Clothes

    Zero Waste Culottes From The Craft of Clothes

    Behold! Fancy pants!

    A pair of dark red culottes, being modelled by a white person with dark hair. The culottes are knee length and high waisted. There is decorative purple topstitching along the front leg panels. The waistband is plain except for two black plastic snaps holding it closed.

    The pattern for these pants was one of my Christmas gifts. It comes from Liz at The Craft of Clothes, a zero-waste designer. I've really gravitated towards self-drafting and zero-waste sewing in the last couple of years, and this pattern has been on my list for a good six months, so I was excited to get into it.

    Drafting

    The first step (after reading the pattern through twice) is drafting the pattern pieces.

    A large glass table holds an iPad with a set of instructions open on it, and equipment for drafting clothing patterns. A long roll of construction paper lays across the width of the table and is held down at one end with a craft cutting mat. There are long, straight pencil lines drawn on the paper. A quilter's ruler and a pencil lay across the pattern in progress. End ID.

    My biggest starting hurdle was deciphering "the culottes are designed to sit on your waist" when choosing the correct pattern size. Most designers consider "the waist" to be the teapot - that is, the true waist. (It's easiest to find if you bend to the side and stick your hand in the crease - like you're singing "I'm a little teapot".) But some consider belly button height to be "the waist". I generally wear my pants at the latter height, and there's a good 2" circumference difference between those two for me.

    I eventually decided to call my belly button my waist, on the grounds that that's where I prefer to wear my pants. It's also easier to take seams in than out, if I guessed wrong.

    Decisions over, it was smooth sailing from there. Pattern drafting is not a technically difficult process, as long as you have good instructions, and Liz's patterns definitely fit that bill. But there's a lot of attention to detail required to make sure the end result is good. That sort of thing always makes me nervous. Fortunately there was only two pattern pieces to draft, and they're 98% straight lines and based off rectangles.

    Interestingly, this is the first zero-waste pattern I've tried that has you draft pattern pieces to use. The others I've seen (most by the creator of this pattern - our library had a copy of her book, Zero Waste Sewing) have had you draw directly on your piece of fabric to create the layout. (In fairness, I didn't have to draft my own pieces. The pattern came with the option of self-drafting, printing on A4, or printing on A0.)

    I much prefer the direct-draw method to faffing about with pattern pieces. But given that this pattern is designed to have the pieces tesselate, having a set of physical pattern pieces does make more sense. It's also got me wondering if I could successfully make a pair out of old jeans legs, using one leg per pattern piece. But then, I'm always looking for ways to use up my denim pile...

    Sewing

    I prefer structure rather than flow in my butt coverings, so I was somewhat limited in my fabric choices for this first pair. (I know the fabric I really want to use, but I am being a sensible apprentice and trying things out on a nice-but-less-hideously-expensive fabric first.) Most of my stash acquisition has focused on stuff for shirts, since I wear those out faster than pants. I eventually settled on this nice brick red, 100% cotton, table cloth.

    A large red piece of fabric is draped over an unseen structure in a grassy back yard. End ID.
    The picture is suffering from sun exposure. It's nowhere near this bright in person.

    I laid out the pieces and huzzah! The fabric was just big enough! ... But only if I unpicked the hems (they're monsters, a full 3 cm/1.2" each side) and ironed them flat first. Thus, it was time for a marathon unpicking and ironing session.

    After that was done, I checked the pattern fit again. Huzzah! I had enough space for all the pattern pieces, and not very much scrap left over once I'd cut them all out. (Of course, it was late and I wasn't paying as much attention as I should have been, so I didn't add an extra inch when I was forced to cut the waistband in two pieces. There was enough extra fabric that this was only an annoyance and not a complete disaster.)

    A large piece of dark red fabric, folded in half, is laid out on a wooden floor. Two large pattern pieces lie on top of it, almost covering the entire fabric in view. There is about 3 inches of fabric showing at the top of the pattern pieces, and about four and a half inches along the right sides where the selvedges of the fabric can be seen. End ID.
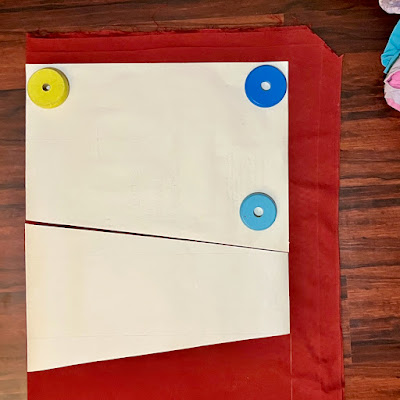
    The fabric at the top is scrap. All but a few inches of the stuff on the right became waist bands and plackets.

    Sewing was a fairly straightforward exercise, though it required enough brainpower that I completely forgot to take any progress shots as I went. Almost every step of the pattern comes with a diagram to show you what to do, which helped me immensely. So did having the seam allowances specified at each point, as there's three different ones used in different places.

    That's not to say I didn't screw up, of course. While sewing the crotch seam, I somehow managed to close up the front of the pants entirely and leave a gap for the placket open at the back. (That will teach me not to double check the direction the pockets are facing before I pin and sew that seam. Maybe.) 

    I also made a highly decorative and completely awful to sew with choice for topstitching thread, which I quickly became too stubborn to stop using. So the topstitching is, uh, not great. But it is purple and sparkly, and if I'd had any sense at all I would have left it til last (or even done some sort of hand embroidery with it).

    a close up of dark red fabric with a line of decorative topstitching running along a seam. The topstitching is done in a sparkly, dark purple thread using a ~4mm stitch. There are several places where the thread has broken and had to be re-sewn. End ID.
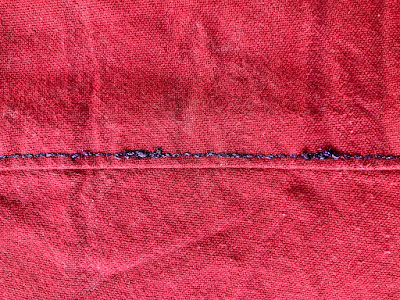
    I was tricked by the first line of stitching being so easy. LIES. It was all lies.

    Why should I have left it til last? Because it turns out that the culottes are, in fact, designed to sit on one's true waist. Which meant I had a two inch difference between what I needed to fit me, and what the waist measurement was. If I hadn't top stitched the panels, I could have simply ran another line of stitching down the seams that didn't have pockets in the way, and taken the waist in without much fuss or bother. Unfortunately, I didn't do that, so I was left with two choices.

    1. Take out the topstitching and take in all the panels, bitching and moaning about the effort I went to and the number of times the topstitch thread broke while I was sewing the stupid sparkly goodness onto things.
    2. Work out how to take the waist in by the necessary two inches, using only the crotch seam and maybe some darts or pleats or something.

    Choice #1 would have been the logical, rational decision, so of course I went with option #2.

    An hour and change of basting, pinning and unpinning the waistband, and completely forgetting how seam allowances work later, I managed to get a fit I was happy enough with. I ended up grading in a dart-like object at the centre back. (If I decide later that I'm not happy with the fit after all, I'll try out the modification for adding elastic to the back waistband that the pattern also includes. Probably while questioning my life choices and lamenting the amount of time I spend with a seam ripper in hand.)

    a close up of the seam in the centre back of a pair of dark red culottes. The fabric has been overlocked along the edge and there is a line of straight stitching 1.5 cm from the edge. There is another line of stitching that starts 7.5cm in from the edge underneath the waistband. It travels down 25 cm, tapering into the first stitching line at the bottom. End ID.
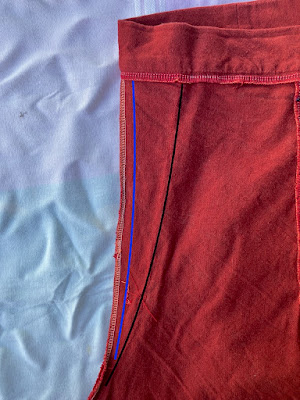
    The original stitching line is in blue, the new one is in black.

    After all that fitting woe, I wasn't in the mood to try buttonholes (my good machine, the one with the automatic buttonholer, is currently out of action). Instead I dove into my snap stash to close the placket.

    a close up of the placket and the snaps used to close it. The placket fabric is bright red with large skulls on it. The snaps are lavender. End ID.
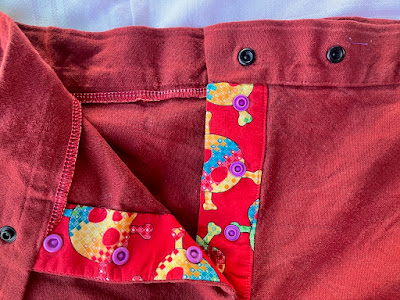
    I love using bright, vivid colours for inner details. It's the sewing equivalent of wearing leopard print underwear.

    A nice bonus of using the snaps is that I could put them through just the placket, leaving the fly front clean. This did make the placket pull slightly when I'm wearing the pants, exposing a trace of bright red. I fixed that by invisibly whip-stitching through the placket and outer fabric to hold everything in place. Next time I'll also double check the understitching, and topstitch the edge if needed, before installing the snaps.

    Field Test and Adjustments

    Trying stuff on as you go is all well and good, but nothing tells you what you really need to fix like being out in the field. I quickly discovered several things:

    • The waistband needs serious help to stay where it's supposed to be. Which, y'know, I did make a size larger than I should have. This was not surprising.
    • The crotch needs to either drop a wee bit or (preferably) rise a couple of inches. The latter will likely spoil the skirt-effect somewhat, but it will be far more comfortable for my legs.
    • I need a loop on the waistband to hold my keys.

    For the waist woes, I had a few choices - 1) belt loops, 2) suspenders, or 3) add elastic to the back waistband. Belt loops are fiddly to make and sew on, but would solve the key-hanging issue. Suspenders technically wouldn't need any sewing changes, but the clip-on style are notorious for pulling off when you're doing things. And while the pattern includes instructions for adding elastic to the waistband, I wasn't confident it would do the job I wanted (I stick a fair amount of junk in my pockets and elastic can't always cope with the weight).

    After some dithering, I went with the suspender option for this pair. I like the look of them, and the "floating" effect they give when they pull the waistband a bit above where gravity wants it to sit is extremely comfortable. But I didn't want to deal with clips always popping off. So I indulged in a quick side-quest of improving my suspenders, then sewed buttons into the waistband of the culottes.

    The end of a pair of clip-on, rainbow elastic suspenders. The clip has been removed, leaving the wire that attached it to the elastic. The wire has been bent so that the ends that were holding the clip in place overlap each other. End ID.
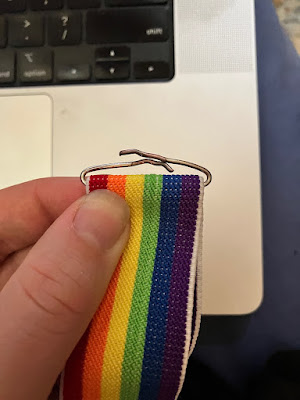
    This used to hold the clips, but the wire was easy to bend flat with needle-nose pliers.
    The ends of two suspender straps sit side by side on a wooden table. They have had tabs of black cloth sewn onto the ends. There is a hand-sewn buttonhole done in thick cream thread on each cloth tab. End ID.
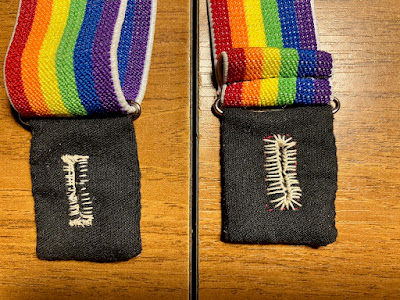
    Gee, I wonder which buttonhole I did first?

    Fashion Show

    Overall, I'm quite happy with how it all came together. I'll definitely be making at least two more pairs - the "men's" version (less flare in the hems), likely out of recycled denim, and a pair in heavyweight stash linen.

    The back of a pair of red culottes, worn by a white person. They are attached to rainbow suspenders. End ID.
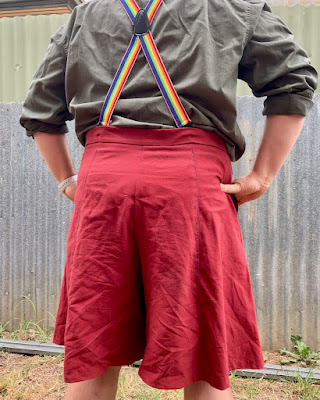
    The back panel adjustment is basically unnoticeable.

    A white person with dark hair models a pair of knee length,  red culottes. They are standing on one leg, with the other raised to hip height with the knee bent, to show the range of motion allowed by the culottes. End ID.
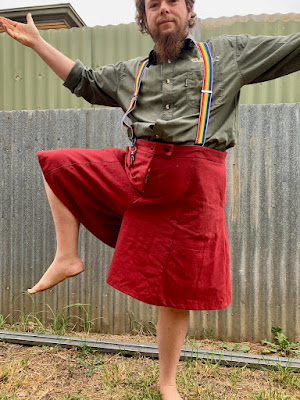
    They have great range of movement - maybe I need to make a workout pair?

    a close up of a pair of red culottes being held up with rainbow suspenders. A set of keys is clipped onto the the suspenders just above the waistband of the culottes. End ID.
    And I even have somewhere to hang my keys.

    This post was originally published on my blog, Garak's Apprentice . I currently syndicate my content at Micro.blog, Tumblr, and Ko-Fi.

    Buy Me a Coffee at ko-fi.com or Tip me via PayPal

    How I Wet Finish Weaving Projects

    This post is based off a reply I gave to this Tumblr thread asking about wet-finishing advice for handwovens. The Tumblrite above me gave excellent instructions for gently hand-washing items, a practice I respect but don’t use myself. I’ve edited a bit for clarity and added a few extra things I didn’t think of at the time.

    My reply

    What @crow-crafting said is a great approach for most weaving, especially if your yarn is prone to fulling (felting, but with spun fibres) and you want to be able to control that process completely. The only thing I’d add is that if you’re hanging it to dry, it can really help to hang it over a thick bar or rod rather than just a regular washing line. Some yarns will take offence to the line and set a permanent crease if it’s the first time they’ve been washed.

    Personally, I tend to be more aggressive with wet finishing. I know I will never have the executive function to consistently hand wash whatever I’ve made, so I wet finish my weaving at least as aggressively as I expect its future washings to be. Which means I almost always do samples before getting into the actual project.

    Disclaimer: I weave a lot more yardage than I do scarves, so my process is built around the expectation that I’m going to be weaving A Very Big Thing and I want it to turn out right at the end. I probably wouldn’t be so extra about stuff like scarves unless I wanted to play with weft colours for a bit first.

    When I’m warping a project, I’ll add at least an extra half metre and use it to weave samples at the start. I sometimes need to try different weft colours, but when I’ve decided which I like, I weave at least 8 inches. I then cut the sample off the loom and re-tie the warp. Peggy Osterkamp’s blog has a tutorial on how to do this here: https://peggyosterkamp.com/2020/04/cutting-off-some-of-the-cloth-before-the-warp-is-finished-the-two-stick-heading/

    Then, I cut that sample into three pieces and finish the raw edges. The first bit goes straight into my weaving project book - “loom state”. The second I wash using the wool or delicates setting on my machine - “gentle wash”. The third I throw in the wash with the regular laundry (bonus points if there’s a pair of jeans in there too) - “aggressive wash”. HINT: sew a contrasting thread into the hem of one of the washed samples, and note down which one, so you don’t get them mixed up later. I always sew a contrast thread into the “gentle wash” piece and leave the “aggressive wash” piece bare.

    alt= a piece of cardboard about the size of an A4 sheet of paper. There is a project number written in black Sharpie in the top right corner. The cardboard has two pieces of light pink, handwoven cloth stapled to it, one above the other. The one at the top is labelled 'raw'. The one underneath is labelled 'cotton wash'. End ID.The number in the top right corner is the project number. I use it to easily cross-reference between my digital and physical notes.

    I have a front loader, so it’s all very hands-off for me. Some people wet finish in their top-loading machines and babysit the fabric the entire time, pull it out when it’s at the right level of “done” for their liking, and then spin the water out, iron, etc. The takeaway is to experiment, and do whatever works for you.

    After washing, I let the pieces dry a bit, but not completely. I iron them while they’re still damp so they don’t set wrinkles - this is less a problem with, say, knitting yarns than ones sold specifically for weaving, but it’s still something that can happen.

    After that, I compare samples and decide which one I like more. This is a very personal thing. Often both samples turn out good fabric - they might just be suited to different applications. Since I mostly weave garment yardage, I’m generally looking for a denser, sturdier fabric than if I was weaving scarves or wraps. I also note the amount of shrinkage, and if it was more or less than I expected.

    If there’s little or no difference between the samples, I usually plan for the aggressive wash because then I know that whatever I make will likely survive whatever it gets thrown into.

    What about inkle bands?

    I don’t usually wet finish these, unless I’m specifically weaving them as trim or facing for a garment. (If I’m honest, I rarely remember to wet-finish them before I apply them to the garment, either.) Both tablet weave and heddled bands are quite stable in their finished state, so shrinkage from wet finishing tends to be minimal to non-existent.

    That said, 99% of the time I’m weaving bands with 100% cotton in a variety of weights, or poly-cotton sewing threads. If I was doing a band silk or wool, I’d be more inclined to weave a good long test piece - at least half a metre but preferably double that - and throw it through the same kinds of wash the finished garment will go through. I probably wouldn’t iron the band unless it was going on a garment that I was planning to iron on a regular basis. (There are currently zero clothes in my wardrobe that fit this criteria, just so we’re clear.) If you wanted to be thorough, taking accurate before and after measurements would help. I’d personally be looking more at how the wash affected the quality and hand of the band, and just planning to weave extra. (One can never have too many bands.)

    The nice thing about weaving is that there’s really no one right way to do anything - if you get a result you like, then you did it the right way. And it’s good fun playing around and learning new stuff, so don’t be afraid to experiment!

    A Quick and Easy Suspender Transformation

    I got sick of my clip-on suspenders never staying where they’re supposed to, so I had a go at modifying them for button attachments. (They’re a $3 pair from the op shop so I wasn’t too worried about wrecking them.) The clips came off a lot easier than I expected, and bending the wire wasn’t too much drama.

    The end of a pair of clip-on, rainbow elastic suspenders. The clip has been removed, leaving the wire that attached it to the elastic. End ID. The end of a pair of clip-on, rainbow elastic suspenders. The wire that attached it to the elastic has been bent so that the ends that were holding the clip in place overlap each other. End ID.

    After that I folded the edges in on some black cotton I had lying around, threaded it through the wire, and whip stitched all the edges closed. I also took the opportunity to practice my hand-sewn buttonholes. As you can see, I really need the practice. I did change to a #20 perle cotton instead of the #40 I did the first one with, but most of the improvement is repetition.

    The ends of two suspender straps sit side by side on a wooden table. They have had tabs of black cloth sewn onto the ends. There is a hand-sewn buttonhole done in thick cream thread on each cloth tab. End ID. Left is the first buttonhole I did, right is the fourth.

    I’ve been sewing the suspender buttons to the inside of my waistbands, and I’m pleased to note that you can barely see the buttonhole tabs when they’re buttoned in place. Of course, now I’m lowkey planning a pair (or three) that are completely hand-made, from handwoven inkle bands….